My Personal Favourite Method to Create Bootable USB Drive Form ISO Image to Install Windows 11/10/8/7/Vista and XP
Are you frustrated with the old boring methods to create Windows 11/10/8/7/XP bootable flash drives for school or work? If you’re a student or professional who needs to work with a Windows 11, 10, 8 and 7 computer, you know that a bootable USB flash drive can be a lifesaver. Because sometimes your computer won’t work correctly due to many software issues, so in that case you’ll need a Windows bootable USB flash drive to reinstall Windows operating system.
We know how much you love creating bootable flash drives from ISO Image that allow you to run a fresh Windows installation on your computer. If your computer doesn’t have the right operating system, then you can create a bootable USB flash drive so you can easily install the required operating system on your PC. if you’re not a tech-savvy person, the process of making a bootable USB flash drive can be daunting for you.
If you have a little internet surfing knowledge then you will find lots of bootable creation tools on Google. These tools include Windows Bootable Image Creator, ISO to USB, and the Windows Media Creation Tool etc. But these tools can be difficult to use, and they can take a long time, especially if you’re not familiar with them.However, these tools can be difficult to use and time-consuming,
Fortunately, there are some easier methods that you can use to create a bootable USB flash drive for your Windows 11/10 computer. We will show you how you will create a bootable USB flash drive for your new Windows Installation, in this article using 3 new different methods. Our method is much simpler and quicker that even a 15 year old child can easily understand.
What You will Need Before for creating Bootable USB Drive from ISO Image
A USB flash drive 8GB or 16GB of storage space.
A Windows 11/10/8/7/Vista/XP Any ISO image file. If you don't have, you can download any Windows ISO file from our website
Creating Bootable USB Flash Drive tool (You can choose any tool from below lists)
Method #1: Use Rufus
Hello everyone,We have placed Rufus software at the top of our list. Rufus is a free and open source utility that can be used to create a bootable USB flash drive for Windows 11/10/8/7/XP and Windows Server 2016/2019. The utility can be downloaded from the Rufus website.
Rufus Tool is a very simple, lightweight and easy-to-use tool for everyone that helps you create bootable USB flash drives for Windows 11/10/8/7/Vista/XP and linux. The rufus software is also portable, which means you can carry it around on your bootable USB flash drive and use it on any computer.
In addition, rufus tool comes with many multiple languages like English, French, German, Spanish, Italian, Russian, Portuguese, and Japanese.
Step 1. firstly insert your 8GB USB flash drive into pc. Your flash drive should now be recognized as a removable device (backup your your important data before plug in)
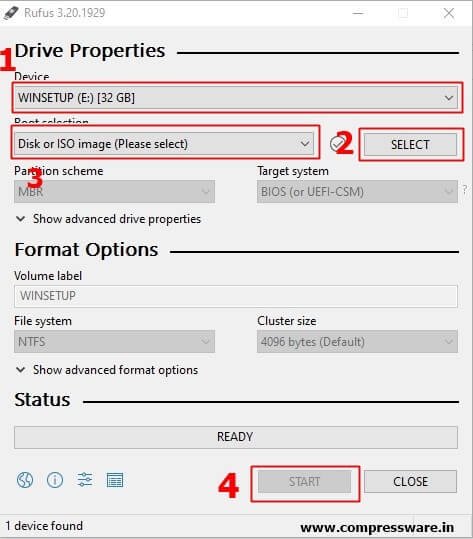
Step 2. Once you downloaded rufus tool, just install it on your system after that you need to open the “Rufus application”. This can be done by “double clicking” on the Rufus icon.
Step 3. In the next, step, click on select “option” and choose the “Windows 11/10/8/7 ISO image file” which you already downloaded.
Step 4. After that you don’t need to change any setting. simply click on “start button” to start creating the Windows 11/10/8/7 bootable USB flash drive.
Finally. Your USB flash drive will now be created for All Windows.
Method 2 : Using PowerISO Tool
You don’t know, but PowerISO is much more popular than Rufus because it lets you create Mac OS X bootable USB flash drive. That’s why we have placed PowerISO at the second of our list.
PowerISO Tool is an ISO image utility software used to create a bootable USB Flash drive. you can create a bootable USB flash drive from Windows 8.1 or Windows 10, Windows 11, Windows xp, MacOS X El Capitan or Yosemite, Linux Mint 18 or Ubuntu 16.04 LTS using PowerISO. PowerISO tool supports a variety of platforms and provides powerful features.
Step 1. First, you need to have a 8GB USB drive connected to the computer.
Step 2. Then “Download PowerISO tool“ from here it take just 1 minute to download.
Step 3. Next run PowerISO tool on “Administrator”.
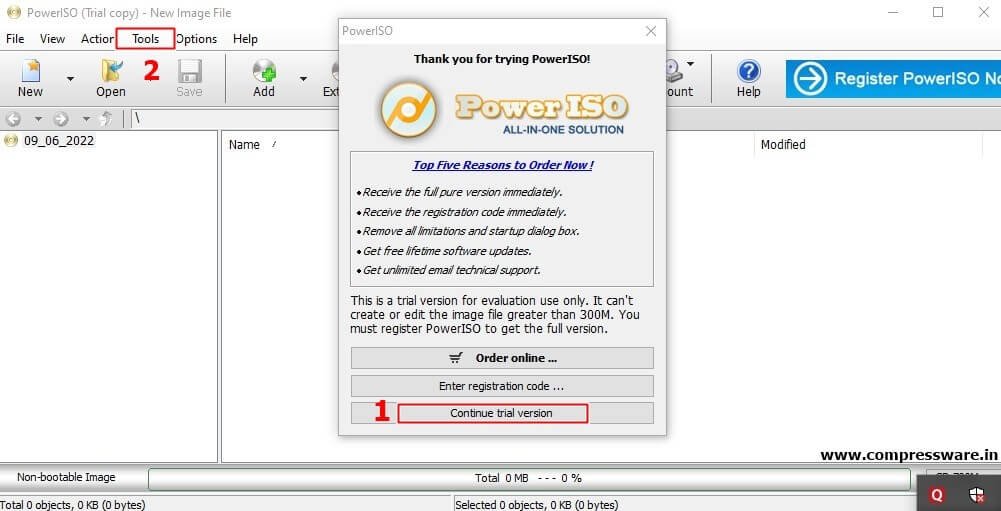
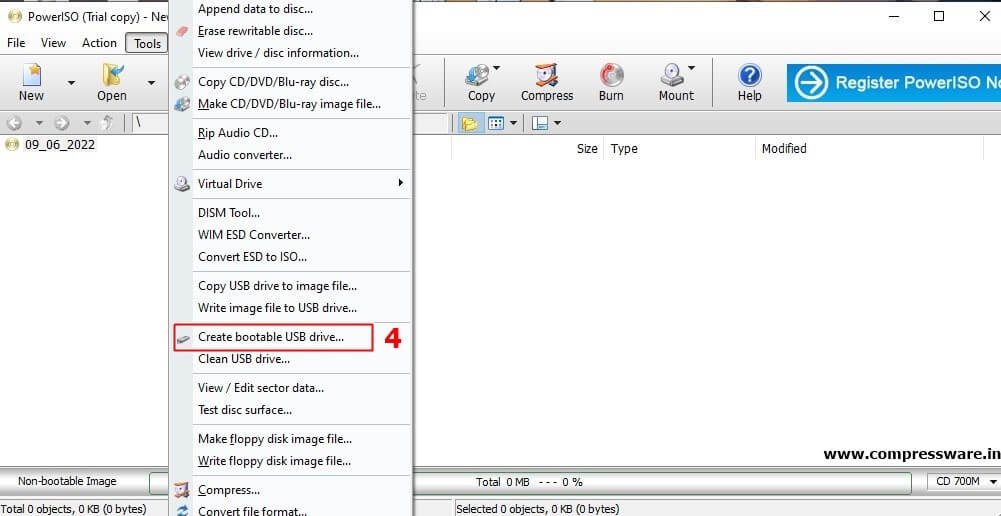
Steo 4. Step 1: Open the PowerISO. click on the top “tool option” and chooset “Create a bootable disk drive”.
Step 5. now it will ask to run on Administartor just click on “okay buton”.
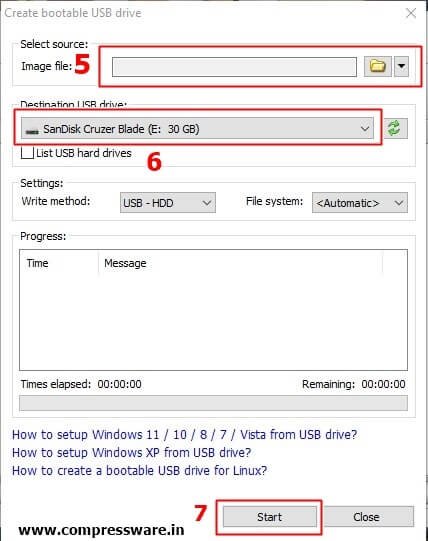
Step 6. in “create bootable usb drive screen”, just select your connected usb flash drive and “Windows 11/10/8 iso image” and click on start button.(Before doing all this, you should back up the data of your USB flash drive.)
Step 7. Now the PowerISO tool will ask for your permission that in this process all your data will be deleted simply click on okay.
Finally. This entire process will take 15 to 20 minutes and your bootable USB flash drive will be ready.
Method 3: Uing WinUSB Maker Tool
WinUSB Maker Tool supports creating a Windows XP/7/8/8.1/10 bootable USB flash drive with multiple versions of Windows. The flash drive can be used for various purposes, including general storage, transferring files and installing Windows XP/7/8/8.1/10/11.
Step.1 Firstly “Download Winusb maker tool” from here. its size is just 1.7MB and Launch it
Step 2. Next Insert the required blank 8 Gb USB flash drive into your laptop.
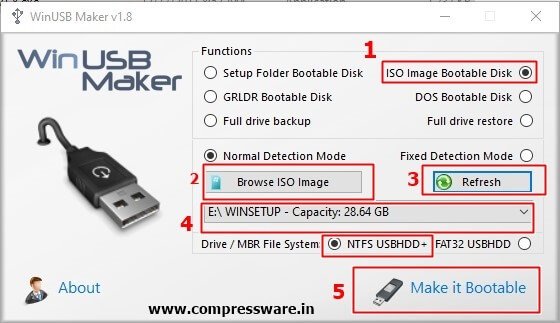
Step 3. in “winUSB Tool screen”, select “ISO Image Bootable DISK Option” then click on “Browse ISO Image” and Choose your Windows 10 or 11 ISO Image file.
Step 4. Now Select your 8GB Blank USB Flash Drive and select “NTFS USBHDD+ option”.
Step 5. Finally Click on “Make it Bootable button” and your process will start.
If everything went fine, then you can create succesfully bootable USB drive for your Laptop, mac and Linux.
NEXT READ THIS:
Final Word:
So, these are the My Personal Method to create windows 11/10/8/7/Vista/XP bootable flash drive in 2024 . Now you can use any your favorite method to create bootable flash drive.


